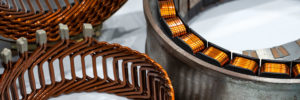
Electric drives consist of a fixed stator and a moving rotor. In order to achieve optimum drive performance and low wear, both components must be matched to each other with well under millimeter precision, so accurate conformity control is of immense importance. Conventional measuring systems, such as coordinate measuring machines (CMMs), generally in combination with various 2D imaging systems are traditionally used for this purpose, but these typically require cycle times of 20 minutes or more.
To accelerate the inspection process, perform defect detection during the manufacturing process, and provide the ability to make real-time adjustments, DWFritz Automation has designed the ZeroTouch non-contact measuring platform for the inspection of rotor-stator systems. In less than one minute, the system creates a 3D digital twin model of the part, using laser measurement technology. This is then compared with the CAD model, so that even deviations of a few micrometers can be detected. This allows inspecting 100% of the production and implementing adjustments in real time at an early stage of the manufacturing process.
New developments and adaptations in motors and other EV components can be expected on a regular basis. “Under these conditions, it is important that the companies establish an efficient quality management system that can be adapted to new developments without losing much time,” explains Mr. Dave Mendez, VP of DWFritz’s ZeroTouch business unit. “To ensure uninterrupted production, quality checks on components should take place in-line at the earliest possible stage of manufacturing.”
As rotors and stators are the main components of electric drives, inspecting them is of critical importance. Even the smallest deviations from geometric dimensioning and tolerancing can lead to major problems. The industry is rapidly transitioning from conventional wound stators to hairpin winding, which can improve fill factor and motor performance. In these designs, if the copper wires are not wound exactly parallel on the stator coil, or the necessary distances between windings are not maintained, motor efficiency is negatively impacted. Furthermore, short circuits can be triggered if the hairpin welds bleed over. Such defects, if not detected and rectified quickly, can compromise motor quality, and also lead to increases in material wastage and scrap.
“A major difficulty in quality testing is that the hairpin method is now used for coil winding of stators,” Mendez explains. “In addition, the stator and rotor are usually produced in parallel on two different production lines, and require near-simultaneous quality control so as not to delay downstream processes, such as motor assembly. As a result, there is very little time available for in-line quality inspection. For this reason, a flexible system is needed that can precisely inspect parts with different geometries and in the shortest possible time.”
Traditional inspection methods, such as a CMM, can no longer meet these increasing demands. “For component quality control, a CMM, even associated with visual inspection by 2D cameras, sometimes requires 20 minutes or more, without being able to check all the individual part features for integrity and completeness,” says Mendez. “Cycle times for rotor and stator production are now less than one minute, so even if only sampling is performed, this results in significant delays to the overall process, and inadequate inspections drive up production costs.”
DWFritz’s ZeroTouch measurement platform ensures 100% part inspection of complex geometries, with short cycle times. The system, which can be installed directly on a production line, creates a 3D digital twin (cloud of points) of the surface, using non-contact sensors that scan the parts with great precision. Between two and seven scanners are used in this process, depending on the complexity of the component being inspected. The digital twin consists of approximately 15 to 30 million measured data points—a very dense and accurate point cloud.
“Between two and four million data points are measured per sensor per second,” Mendez explains. “The data points collected from all sensors are then assembled into an image using custom analysis software and then compared automatically with the CAD model of the stator or rotor. The system can then deliver a conformity or non-conformity diagnosis in real time, thus allowing non-conforming parts to be automatically discarded. At the same time, a detailed inspection report is generated and stored for further analysis. The creation of a digital twin and the automatic deviation analysis takes between 10 and 50 seconds, depending on the complexity of the part geometry, which is significantly faster than the inspection process using a traditional CMM.”
A major advantage of the ZeroTouch measurement platform is that both rotor and stator can be inspected in close succession on just one machine, without having to reconfigure the system each time. Since the inspection takes place in-line, and ZeroTouch can be connected directly to the production lines, all process steps are automated, reducing the need for an employee to convey the components from production line to measuring platform. Non-conforming parts are also sorted out automatically. For each measuring process, the software generates a detailed test report that is sent to the PLC system and the monitoring center of the production line in real time.
“Automobile manufacturers have been facing enormous cost and time pressure as the industry transitions from internal combustion engines to EVs,” reports Mendez. “By integrating a quality inspection system such as ZeroTouch into early stages of production, deviations in tolerances can be quickly identified and addressed, saving manufacturers production errors and contributing to smooth operations and lower costs.”
Source: DWFritz Automation
Source: Charged EVs
Read More
